如何在windows下搭建Nginx+MySQL+PHP环境
2017-12-01 00:10:02
924
思小齐
思小齐
准备所需安装包
本次所选安装版本是:nginx1.11.5,php7.1.0,mysql5.7.16,当然可以根据喜欢的版本下载,为了方便管理,我在D盘下新建了wnmp文件夹,里面包含文件夹有mysql,php,nginx,www,www为存放项目文件夹。
Nginx: 前往nginx.org/en/download.html下载;
PHP:前往Windows.php.net/download下载 ,根据自己的电脑系统位数选择对应版本,顺便说下线程安全版(Thread Safe)和非线程安全版(Non Thread Safe),在Windows下是用FastCGI模式运行php,所以就没必要使用线程安全检查,选用非线程安全版效率会高一些。
MySQL:前往dev.mysql.com/downloads/mysql下载,选择Windows版本。
一 安装MySQL
1.双击安装包进入安装界面,到第二步后建议选择custom(自定义)安装,这样就可以选择mysql文件和数据库文件的存放位置,不然会全部默认安装在C盘;
进入自定义之后只选择安装server就可以,因为其他用不到
点击advanced options选择安装在D:/wnmp/mysql中
之后一直next或者execute,到设置帐号密码这一步设置自己的密码就行了
之后还是next或者execute,直到出现finished,点击,安装mysql完成。
二 安装PHP
1.将php压缩包解压到D盘新建的wnmp/php文件夹中;
2.将php文件夹中的php.ini-development,复制粘贴,将副本改为php.ini;
3.用记事本打开php.ini
    查找到一下代码并将前面的分号去掉
    ;extension_dir = "ext"
    ;cgi.force_redirect = 1
    ;cgi.fix_pathinfo=1
    ;fastcgi.impersonate = 1
    ;cgi.rfc2616_headers = 0
    改为:
    extension_dir = "D:/www/php/ext"
    cgi.force_redirect = 1
    cgi.fix_pathinfo=1
    fastcgi.impersonate = 1
    cgi.rfc2616_headers = 0
三 安装Nginx
1.将Nginx压缩包解压到D盘新建的wnmp/nginx文件夹中;
2.打开nginx/conf/nginx.conf进行配置
将 server {
    listen       80;
    server_name  localhost;
    #charset koi8-r;
    #access_log  logs/host.access.log  main;
    location / {
        root   html;
        index  index.html index.htm;
    }
    # pass the PHP scripts to FastCGI server listening on 127.0.0.1:9000
    #
    #location ~ \.php$ {
    #    root           html;
    #    fastcgi_pass   127.0.0.1:9000;
    #    fastcgi_index  index.php;
    #    fastcgi_param  SCRIPT_FILENAME  /scripts$fastcgi_script_name;
    #    include        fastcgi_params;
    #}
}

改为:
server {
    listen       80;
    server_name  localhost;
    #charset koi8-r;
    #access_log  logs/host.access.log  main;
    location / {
        root   D:/wnmp/www;
        index  index.html index.htm index.php;
    }
    # pass the PHP scripts to FastCGI server listening on 127.0.0.1:9000
    #
    location ~ \.php$ {
        root           D:/wnmp/www;
        fastcgi_pass   127.0.0.1:9000;
        fastcgi_index  index.php;
        fastcgi_param  SCRIPT_FILENAME  $document_root$fastcgi_script_name;
        include        fastcgi_params;
    }
}
保存后双击nginx.exe就可以直接运行Nginx服务器了,打开浏览器输入localhost就可以看到欢迎页。
四 调试
1.打开命令提示符输入D:进入到D盘
D:\>cd wnmp/php
D:\wnmp\PHP>php-cgi.exe -b 127.0.0.1:9000 -c php.ini
启动后再新打开一个命令提示符,输入:netstat -a:findstr "9000"查看9000端口是否被监听,如果是说明cgi运行成功。

2.在www目录下新建index.php
<?php
    $con = mysqli_connect('localhost','root','root','test');
    if($con){
        echo '链接数据库成功!';
    }else{
        echo '链接数据库失败!';
    }
    运行之后输出下面结果,说明可以解析PHP文件且可以链接数据库。

相关推荐
phpstorm添加swoole语法提示
1812
2020-05-11

大佬们都说tcp有黏包的问题,tcp却说:我冤枉!
545
2023-03-02
视频直播技术真的很难吗?手把手带你实现直播技术(一)
1711
2021-01-18
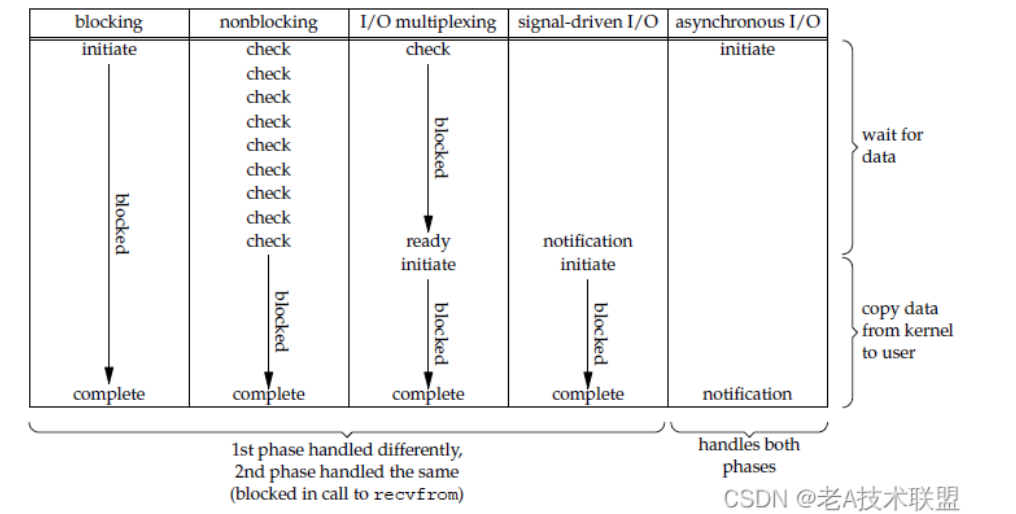
同步与异步、阻塞与非阻塞傻傻分不清楚?你得从linux中的5种IO模型看起
766
2022-07-11
快速学习正则表达式,不用死记硬背,这里有份中文资源和互动学习网站
1547
2020-06-11
php安全之道的大略讲解和总结
3783
2020-07-23
不到40行代码教你如何利用php高效快速的爬取10w+网页数据
1529
2020-05-25
明明白白的聊一下什么是服务发现
462
2023-04-11
面试官又双叒叕问你TCP的三次握手和四次挥手?看这里!有图有真相!!
1270
2021-02-23
ChatGPT为什么这么火爆?这是一篇从入门到玩坏的教程
639
2023-02-09
go集成nacos配置中心并读取配置信息
393
2023-05-29

聊一聊进程、线程和协程以及线程的那些“锁“事
1056
2022-02-08
https你很熟?灵魂三连问之https安全在哪里?客户端如何验证https证书的合法性?ssl是如何加密数据的?
263
2023-08-17
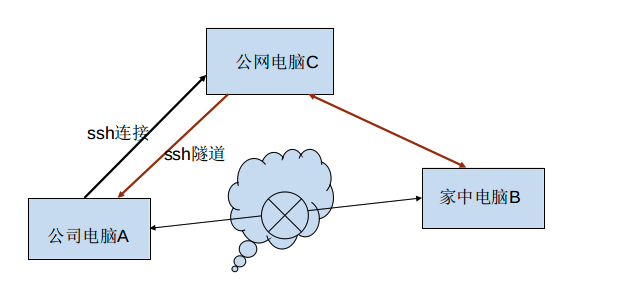
让你的工作更高效!快来看看如何使用内网穿透
1191
2021-09-03
php怎么实现类的自动注册
1227
2021-07-23
golang 单元测试和性能测试
1116
2021-12-23
基于docker实现Redis集群(3主3从)
1478
2020-07-15
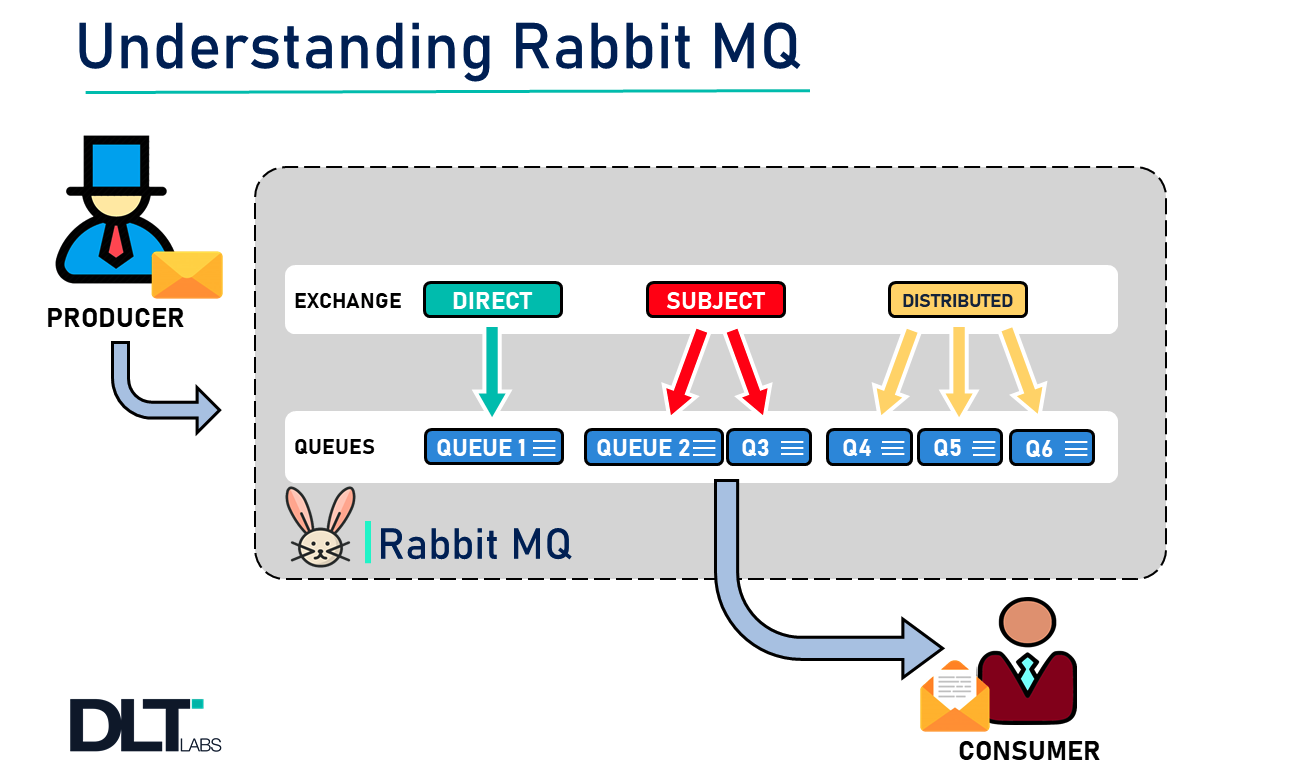
超详细的RabbitMQ快速入门!!你不拿走吗?
1238
2021-08-04
MySQL的内部XA的二阶段提交
134
2024-01-16

PHP孤儿进程、僵尸进程的代码演示和方法处理
1013
2022-03-01
易查网 资源共享 技术分享 phpstorm 激活码 网盘搜索 IDEA永久激活码_IDEA激活码2022和2023IDEA激活码,IDEA激活码 2022Pycharm激活码,Webstorm激活码 亲测有效 慕课网视频教程 慕课网基础教程
关注公众号 获取验证码